Homemation Occupancy Driver
This driver allows for quick & easy setup of Occupancy for a room to turn lights, AV & HVAC off when there has been no movement for a defined period.
Features
- Ramp dimmers to a pre-set level on Occupancy
- Set an Occupancy Timeout of 1 minute to 1 hour
- Turn a rooms AV off when Occupancy Timeout is reached
- Control Thermostats based on Occupancy
- This was tested & works well with the Chowmain Intesis & Sensibo Driver but should work with all Thermostat Drivers
- Enable or disable the Occupancy via UI Button on a Navigator
- Enable, Disable or Toggle the driver with a Keypad with LED feedback
- A separate but FREE Occupancy Controller driver to update multiple Occupancy Drivers simultaneously from programming. This is a HUGE time saver.
Properties
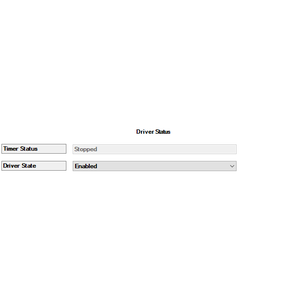
- Driver Settings
- Timer Status: This indicates if the timer started its countdown, stopped for movement or expire
- Driver State: Is the driver Enabled or Disabled.
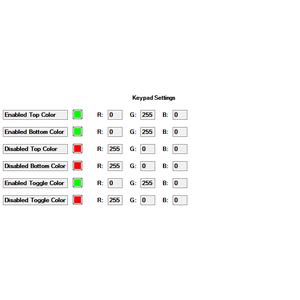
- Keypad Settings
- Select the LED feedback colours when linked to a keypad
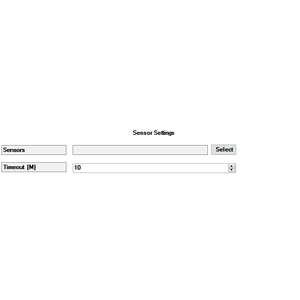
- Sensor Settings
- Sensors: Which motion sensors should trigger the Occupancy Timer
- Timeout [M]: How long after motion is detected should the timer expire
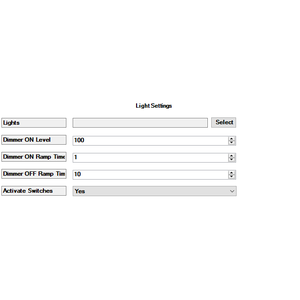
- Lights Settings
- Light(s) on with Occupancy: If you just want to use the driver for Vacancy you can set this to no. the lights will not turn on when Occupancy is detected but will turn the lights off when no Occupancy is detected, and the timer expires
- Lights: Which lights should be controlled when Occupancy is detected or when the timer expires
- Dimmer ON Level: What level should the dimmers selected ramp to when Occupancy is detected
- Dimmer ON Ramp Time [S]: Over what time should the dimmers ramp on by
- Dimmer OFF Ramp Time [S]: Over what time should the dimmers turn off to when the timer expires
- Activate Switches: Should switches be turned on or off (Why? If this is used in the early hours of the morning you might not want switches to turn on & only use dimmers at a low level. This can be toggled with a schedule from programming)
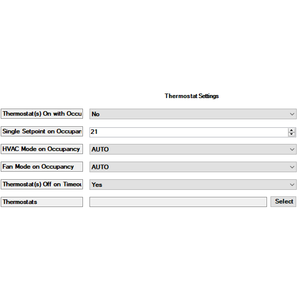
- Thermostat Settings
- Thermostat(s) On with Occupancy: Should the Thermostat(s) turn on when Occupancy is detected.
- Single Setpoint on Occupancy: What temperature should the Thermostat(s) be set to. (the Thermostat(s) must support single setpoint commands)
- HVAC Mode on Occupancy: What HVAC mode should the Thermostat(s) be set to. (Off, Auto, Heat, Dry or Cool)
- Fan Mode on Occupancy: What Fan mode should the Thermostat(s) be set to. (Auto, Low, Medium, High, 1, 2 or 3)
- Thermostat(s) Off on Timeout: Should the Thermostat(s) turn off when the timer expires
- Thermostat(s) Off on Timeout: When the timer expires should the selected thermostats turn off
- Thermostats: Which thermostats should be turned off when the timer expires
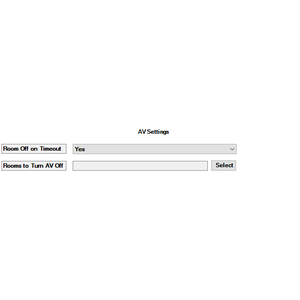
- AV Settings
- Room Off on Timeout: Should the rooms selected send a “Room Off” when the timer expires
- Rooms to Turn AV Off: Which rooms should be turned off when the timer expires
Programming
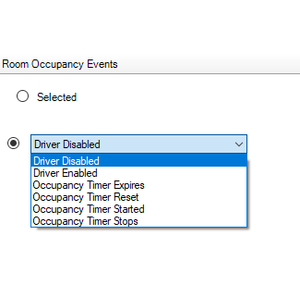
- Programming events:
- When Occupancy Starts
- When Occupancy Expires
- When Occupancy Resets
- When Occupancy Stops
- When Driver is Enabled
- When Driver is Disabled
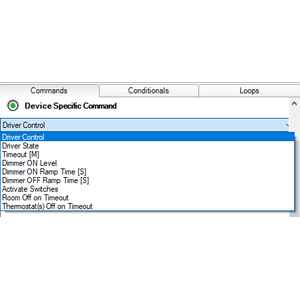
- Programming actions:
- Start, Stop, Restart or Expire the Timer
- Enable or disable the Driver
- Change the timeout value in Minutes
- Change the dimmer(s) ON level value
- Change the dimmer(s) ON ramp on time in seconds
- Change the dimmer(s) OFF ramp on time in seconds
- Enable or disable Switch(es) from activating
- Enable or disable Thermostat(s) turning On with Occupancy
- Set the Single Setpoint on Occupancy
- Set the HVAC Mode on Occupancy
- Set the Fan Mode on Occupancy
- Enable or disable Thermostat(s) turning Thermostat(s) Off on Timeout
Occupancy Driver Controller Driver
- Programming actions: The exact same as the Occupancy Driver with the exception that you can use a device selector to select the Occupancy Driver(s) you would like to update with the set settings
FAQ
- Can you give us some examples of how we could use this driver?
- Save time create occupancy scenarios without the need to venture into the programming section of composer. Select your timeout, select sensor, select your lights, select your thermostat & you’re done.
- If you have this driver controlling each room, you can use it as an all off for a project. The advantage of the driver would be that it could turn off all lights, AV & HVAC with one command. Great for When the Alarm is armed --> Expire all the Occupancy Drivers & the driver handles the rest.
- The inverse of the point above is that you can create an all on for the project. By Simulating Occupancy Briefly all your selected zones will turn on with your pre-set settings.
- Why did you make the driver?
- It started out of frustration when my sales staff would leave cinemas running after a demo. I also had a lot of dealers asking how to program occupancy correctly. I figured there must be a quicker & easier way…
- Can you have more than one Occupancy Driver per project?
- Yes, you can. If a room has a motion sensor, add the driver & take control.
- Do you have to use it with Lighting?
- Nope, if you not using lighting but want to use a sensor to control HVAC or AV then this is the driver for you
- What’s with the Occupancy Controller Driver & how do you use it?
- I had a need to update 15 instances of the driver based on a schedule with the same settings.
- Rather than having to update each driver in programming, you select the setting you want to update, you select the drivers you want to update (just ticking some boxes) & add that to your programming.
- Why the HVAC Control?
- We use the driver extensively in our showroom & offices. Some rooms aren’t used all day & needed these rooms to turn the thermostat on when in use & off when not. Like I mentioned before, I can’t trust my sales staff :-)
- I want to try before I buy…
- No problem, the driver comes with a free 15-day trial
- What’s with the keypad connections?
- I was supporting a dealer and it got me thinking that you can use keypad buttons to welcome you to a room or shut the entire room down. Now this is easy in programming but so much easier when you bind with a connection
- Why wouldn’t I want to activate lights on Occupancy?
- You know how children can be… Leaving lights on all over the place… With this can leave the driver enabled, not turn lights on during the day, but always shut the room down when no one is in the room. At sunset enable the property on all the drivers with the Occupancy Master Driver and everything is back to normal
No posts found
Homemation Occupancy Driver
This driver allows for quick & easy setup of Occupancy for a room to turn lights, AV & HVAC off when there has been no movement for a defined period.
Features
This driver allows for quick & easy setup of Occupancy for a room to turn lights, AV & HVAC off when there has been no movement for a defined period.
Features
- Ramp dimmers to a pre-set level on Occupancy
- Set an Occupancy Timeout of 1 minute to 1 hour
- Turn a rooms AV off when Occupancy Timeout is reached
- Control Thermostats based on Occupancy
- This was tested & works well with the Chowmain Intesis Driver but should work with all Thermostat Drivers
- Enable or disable the Occupancy via UI Button on a Navigator
- Enable, Disable or Toggle the driver with a Keypad with LED feedback
- A separate but FREE Occupancy Controller driver to update multiple Occupancy Drivers simultaneously from programming
Properties
- Driver Settings
- Timer Status: This indicates if the timer started its countdown, stopped for movement or expire
- Driver State: Is the driver Enabled or Disabled.
- Keypad Settings
- Select the LED feedback colours when linked to a keypad
- Sensor Settings
- Sensors: Which motion sensors should trigger the Occupancy Timer
- Timeout [M]: How long after motion is detected should the timer expire
- Lights Settings
- Lights: Which lights should be controlled when Occupancy is detected or when the timer expires
- Dimmer ON Level: What level should the dimmers selected ramp to when Occupancy is detected
- Dimmer ON Ramp Time [S]: Over what time should the dimmers ramp on by
- Dimmer OFF Ramp Time [S]: Over what time should the dimmers turn off to when the timer expires
- Activate Switches: Should switches be turned on or off (Why? If this is used in the early hours of the morning you might not want switches to turn on & only use dimmers at a low level. This can be toggled with a schedule from programming)
- Thermostat Settings
- Thermostat(s) On with Occupancy: Should the Thermostat(s) turn on when Occupancy is detected.
- Single Setpoint on Occupancy: What temperature should the Thermostat(s) be set to. (the Thermostat(s) must support single setpoint commands)
- HVAC Mode on Occupancy: What HVAC mode should the Thermostat(s) be set to. (Off, Auto, Heat, Dry or Cool)
- Fan Mode on Occupancy: What Fan mode should the Thermostat(s) be set to. (Auto, Low, Medium, High, 1, 2 or 3)
- Thermostat(s) Off on Timeout: Should the Thermostat(s) turn off when the timer expires
- Thermostat(s) Off on Timeout: When the timer expires should the selected thermostats turn off
- Thermostats: Which thermostats should be turned off when the timer expires
- AV Settings
- Room Off on Timeout: Should the rooms selected send a “Room Off” when the timer expires
- Rooms to Turn AV Off: Which rooms should be turned off when the timer expires
Programming
- Programming events:
- When Occupancy Starts
- When Occupancy Expires
- When Occupancy Resets
- When Occupancy Stops
- When Driver is Enabled
- When Driver is Disabled
- Programming actions:
- Start, Stop, Restart or Expire the Timer
- Enable or disable the Driver
- Change the timeout value in Minutes
- Change the dimmer(s) ON level value
- Change the dimmer(s) ON ramp on time in seconds
- Change the dimmer(s) OFF ramp on time in seconds
- Enable or disable Switch(es) from activating
- Enable or disable Thermostat(s) turning On with Occupancy
- Set the Single Setpoint on Occupancy
- Set the HVAC Mode on Occupancy
- Set the Fan Mode on Occupancy
- Enable or disable Thermostat(s) turning Thermostat(s) Off on Timeout
Occupancy Driver Controller Driver
- Programming actions: The exact same as the Occupancy Driver with the exception that you can use a device selector to select the Occupancy Driver(s) you would like to update with the set settings
FAQ
- Can you give us some examples of how we could use this driver?
- Save time create occupancy scenarios without the need to venture into the programming section of composer. Select your timeout, select sensor, select your lights, select your thermostat & you’re done.
- If you have this driver controlling each room, you can use it as an all off for a project. The advantage of the driver would be that it could turn off all lights, AV & HVAC with one command. Great for When the Alarm is armed --> Expire all the Occupancy Drivers & the driver handles the rest.
- The inverse of the point above is that you can create an all on for the project. By Simulating Occupancy Briefly all your selected zones will turn on with your pre-set settings.
- Why did you make the driver?
- It started out of frustration when my sales staff would leave cinemas running after a demo. I also had a lot of dealers asking how to program occupancy correctly. I figured there must be a quicker & easier way…
- Can you have more than one Occupancy Driver per project?
- Yes, you can. If a room has a motion sensor, add the driver & take control.
- Do you have to use it with Lighting?
- Nope, if you not using lighting but want to use a sensor to control HVAC or AV then this is the driver for you
- What’s with the Occupancy Controller Driver & how do you use it?
- I had a need to update 15 instances of the driver based on a schedule with the same settings.
- Rather than having to update each driver in programming, you select the setting you want to update, you select the drivers you want to update (just ticking some boxes) & add that to your programming.
- Why the HVAC Control?
- We use the driver extensively in our showroom & offices. Some rooms aren’t used all day & needed these rooms to turn the thermostat on when in use & off when not. Like I mentioned before, I can’t trust my sales staff :-)
- I want to try before I buy…
- No problem, the driver comes with a free 90-day trial
- What’s with the keypad connections?
- I was supporting a dealer and it got me thinking that you can use keypad buttons to welcome you to a room or shut the entire room down. Now this is easy in programming but so much easier when you bind with a connection
- Why wouldn’t I want to activate lights on Occupancy?
- You know how children can be… Leaving lights on all over the place… With this can leave the driver enabled, not turn lights on during the day, but always shut the room down when no one is in the room. At sunset enable the property on all the drivers with the Occupancy Master Driver and everything is back to normal
Version 20201216
- Fixed some comparison code for Conditionals
- Added more Fan Mode options
- Added the ability to not turn the lights off on timeout
- Added some extra debugging feedback
Version 20201212
- Added code for the Follow Me Driver
- Fixed a bug with activating switches on first occupancy
- Added the ability to change the “Light(s) On with Occupancy” property from programming
- Refreshed the look of the icons
Version 20190916
- Cleaned up the code handling the keypad colour updates
- Added a property to choose to activate lights on Occupancy or not
- Added 5 new keypad connection:
- Fresh Start Occupancy Link: This output connections allows you to bind to a device like a keypad so that you can activate the items set in the properties page via a keypad with or without than a sensor
- Simulate Occupancy Link: This output connections allows you to bind to a device like a keypad so that you can use the keypad button briefly simulate detection the same way a sensor would work
- Expire Timer Link: This output connections allows you to bind to a device like a keypad so that you can turn the items set in the properties page off via a keypad with or without than a sensor
- Occupancy First Detected Link: This input connection sends a Single Click down the connection. Useful if you would like to link this to a lighting scene rather than controlling the lighting loads directly
- Occupancy Timer Expires Link: Useful if you would like to link this to a lighting scene rather than controlling the lighting loads directly
Version 20190903
- Fixed a comparison problem with Conditionals
- Added more Fan Mode options
Version 20190901
- Corrected a problem with updating keypad colours via connections
Version 20190221
- Increased the Occupancy Timeout max to 480 minutes rather than just 60
- Added a Programming Command & Action to briefly simulate occupancy
- Added Properties & Programming to Turn on & Set a Thermostat with Occupancy
- Added functionality for the Occupancy Master Control Driver
Version 20180804
- Neatened up the properties page
- Added keypad connections with colour feedback to enable, disable & toggle the driver state.
- Corrected error where the Event didn’t fire when the driver was Enable or Disabled
- Changed some logic to better handle sensors that hold occupancy for long periods of time, like ZigBee based sensors.
Version 20171007
- Initial Release

